First Aid in the Workplace
Additional material to support your information poster, with a quiz to test your knowledge.
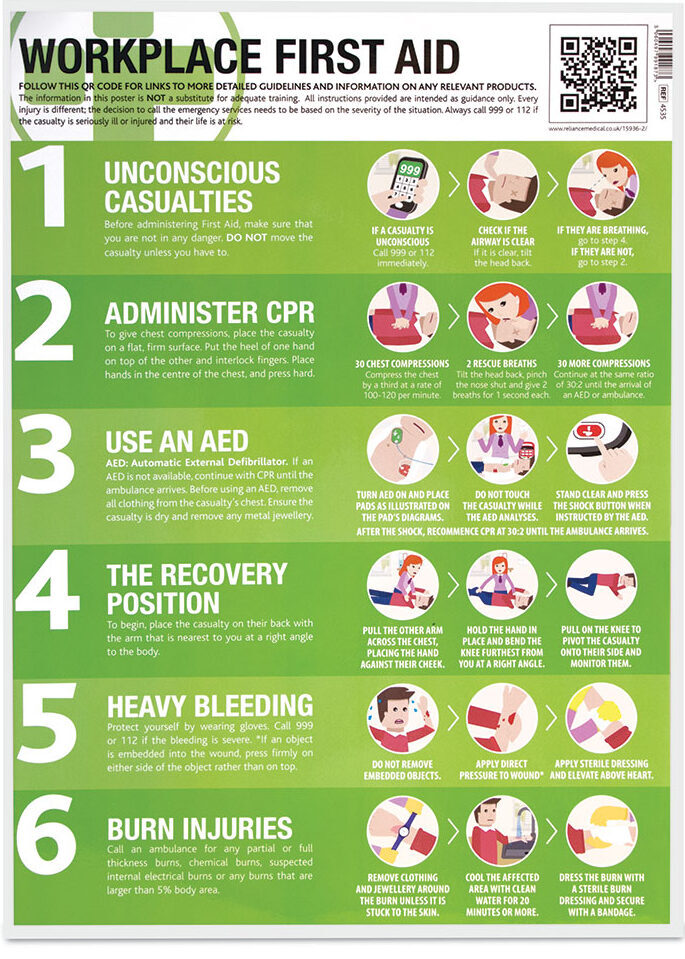
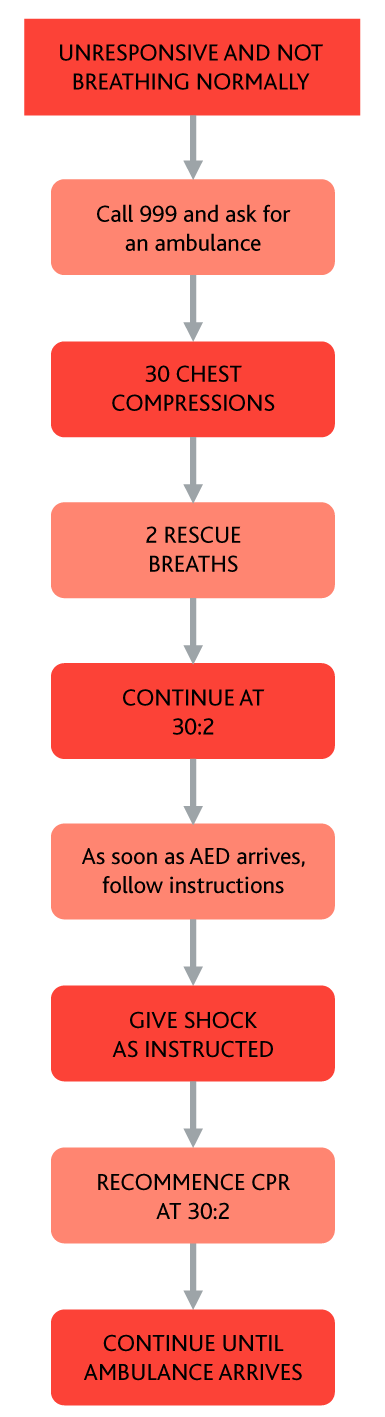
CARDIAC ARREST
Cardiac Arrest occurs when the heart suddenly and unexpectedly stops beating normally. When this happens, blood stops flowing to the brain and other vital organs. Ventricular fibrillation, the most common cause of Cardiac Arrest, happens when the electrical activity of your heart becomes so chaotic that the heart stops pumping and quivers instead. Sudden Cardiac Arrest can happen at any time. Immediate defibrillation and effective CPR can quadruple someone’s chances of survival. Using an Automatic External Defibrillator (AED) is easier than many people think, and they can be used by any bystander without training.
1. MAKE SURE THE AREA IS SAFE
Whenever you approach an incident, your first consideration should be to protect yourself by making sure that the environment is safe. Check for electricity, fire, fumes, traffic etc. Do NOT move the casualty unless absolutely necessary.
2. CHECK FOR A RESPONSE
Check if the casualty is conscious or not by calling their name and shaking their shoulders gently. You should also shout loudly for somebody to help you. If someone can help, they should call the Emergency Services and locate an AED while you concentrate on checking the casualty’s ABC’s (Airway, Breathing, and Circulation (CPR).
3. CALL 999 OR 112
If someone has responded and has arrived to help, ask them to call and speak to the Emergency Services; if not, call them yourself. If possible, stay with the victim while making the call. If there is a hands-free speaker function on your phone, activating it may help you communicate with the Ambulance Service while performing CPR.
4. EXAMINE THE AIRWAY
Check inside the casualty’s mouth for any obvious obstructions. If the airway is clear, turn the victim onto their back (if they are not already on it). Gently tilt their head back, then with your fingertips under the point of the victim’s chin, lift their chin to open the airway.
5. CHECK BREATHING
Look, listen, and feel for normal breathing for no more than 10 seconds. In the first few minutes after Cardiac Arrest, a victim may be barely breathing, or just taking infrequent, slow and noisy gasps. Do not confuse this with normal breathing. If you have any doubt whether their breathing is normal, act as though it is not and prepare to start CPR.
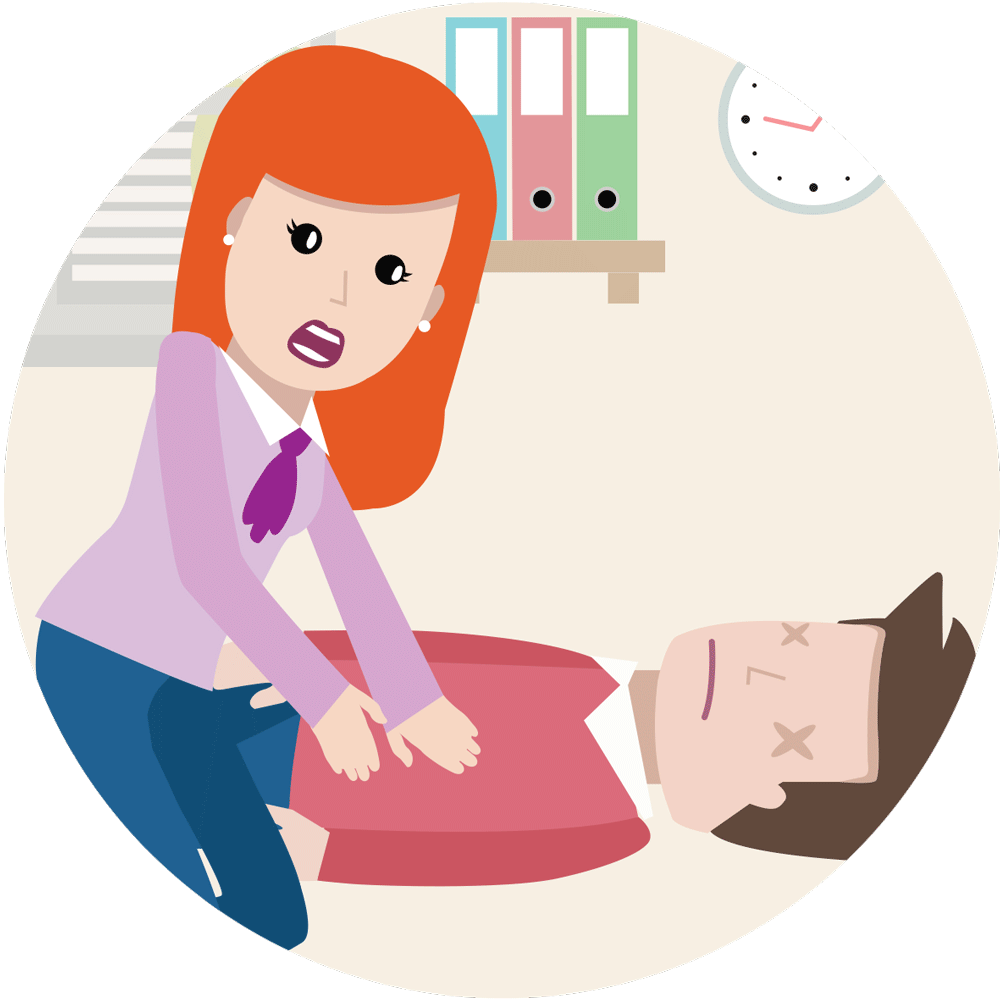
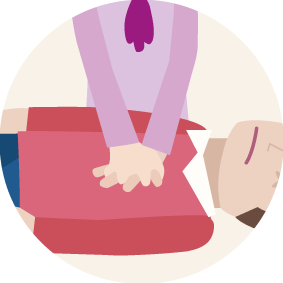
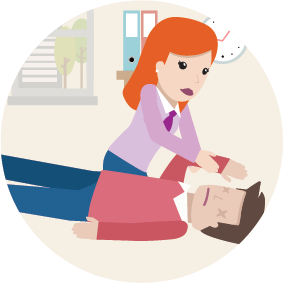
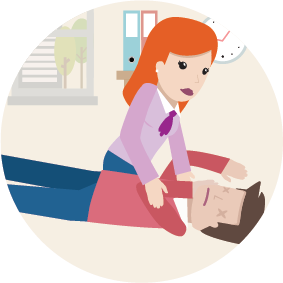
6. ADMINISTER CPR
GIVE 30 COMPRESSIONS
Kneel by the side of the victim and place the heel of one hand on the centre of the victim’s chest; (this is the lower half of the victim’s breastbone/sternum. Place the heel of your other hand on top of the first hand, then interlock the fingers of your hands, ensuring that no pressure is applied to the victim’s ribs. Keep your arms straight. Do not apply any pressure over the upper abdomen or the bottom end of the bony sternum (breastbone). Position your shoulders vertically above the victim’s chest and press down on the sternum to a depth of 5–6 cm (approximately a third of the depth). After each compression, release all the pressure on the chest without losing contact between your hands and the sternum. Repeat 30 times at a rate of 100–120 per minute.
GIVE 2 RESCUE BREATHS
After 30 compressions open the airway again, by using the head tilt and chin lift and give 2 rescue breaths. To give rescue breaths, use the index finger and thumb of your hand that is resting on their forehead to pinch the soft part of their nose closed. Allow the mouth to open, but maintain the chin lift. Take a normal breath then place your lips around their mouth, making sure that you have a good seal. Blow steadily into their mouth while watching for their chest to rise, taking about 1 second as in normal breathing; this is equivalent to one rescue breath.
Maintaining the head tilt and chin lift, remove your mouth from the victim and watch for their chest falling as air comes out, then take another normal breath and blow into the victim’s mouth once more to achieve a total of two effective rescue breaths. Do not interrupt the chest compressions by more than 10 seconds to deliver the two breaths. Next, return your hands without delay to the correct position on the sternum and give a further 30 chest compressions.
GIVE 30 MORE COMPRESSIONS
Continue with chest compressions and rescue breaths as described above at a ratio of 30:2. If you are untrained or unable to carry out rescue breaths, give chest-compression-only CPR (i.e. continuous compressions at a rate of at least 100–120 per minute).
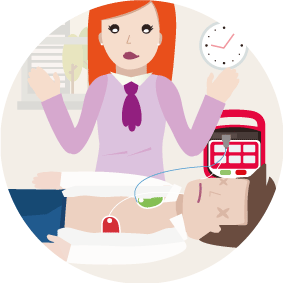
7. USE AN AED
First, make certain that the casualty is dry. Remove any metal jewellery or under-wired bra’s as these can cause burns. Switch on the AED and attach the electrode pads to the victim’s bare chest in the way that is illustrated on the pad’s diagrams. If more than one rescuer is present, CPR should be continued while the pads are being attached to the chest. Follow the spoken/visual directions of the AED. Ensure that nobody is touching the victim while the AED is analysing the rhythm.
If a shock is advised, make sure that nobody is touching the victim then push the shock button as directed to deliver a shock. Immediately restart CPR at a ratio of 30:2. Continue as directed by the voice/visual prompts.
If no shock is indicated, continue CPR. Immediately resume CPR.
8. CONTINUE CPR
Do not interrupt resuscitation until a health professional arrives and tells you to stop, or you see the victim definitely waking up, moving, opening their eyes, and breathing normally.
It is rare for CPR alone to restart the heart. Unless you are certain the person has recovered, continue CPR.
If your arms start to tire, see if another person can assist with the chest compressions.
The above information has been based on the guidance of the Resuscitation Council (UK) – Adult Advanced Life Support
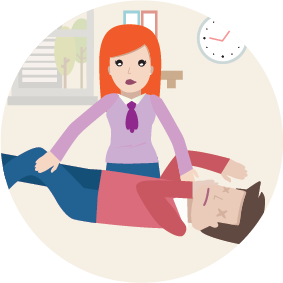
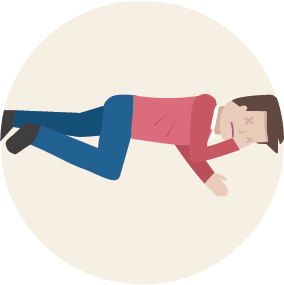
THE RECOVERY POSITION
If the casualty is unresponsive but is breathing normally, turn them into the recovery position. N.B. Often, victims of Cardiac Arrest will have Agonal breathing. Agonal breaths are irregular, slow, and deep breaths, frequently accompanied by a characteristic snoring sound. The presence of Agonal breathing is often wrongly interpreted as evidence of a circulation and that CPR is not needed. This is incorrect. Bystanders should suspect Cardiac Arrest and start CPR if the victim is unresponsive and not breathing normally.
Putting someone in the recovery position will keep their airway clear and open. It also ensures that any vomit or fluid won’t cause them to choke. If you are confident that the casualty is breathing normally, put them into the recovery position as follows:
N.B. If you suspect the casualty may have a spinal injury, DO NOT attempt to move them until the Emergency Services reach you.
SEVERE BLEEDING
If you are administering first aid to a casualty who is bleeding heavily, the main aim is to prevent further blood loss and minimise the effects of shock. In this case, shock does not mean emotional shock, but the life-threatening condition often caused by loss of blood.
Although first aid must be given as soon as possible, you should always wear a pair of disposable gloves when you are dealing with a casualty that is bleeding, as it will protect both of you from the spread of any infections.
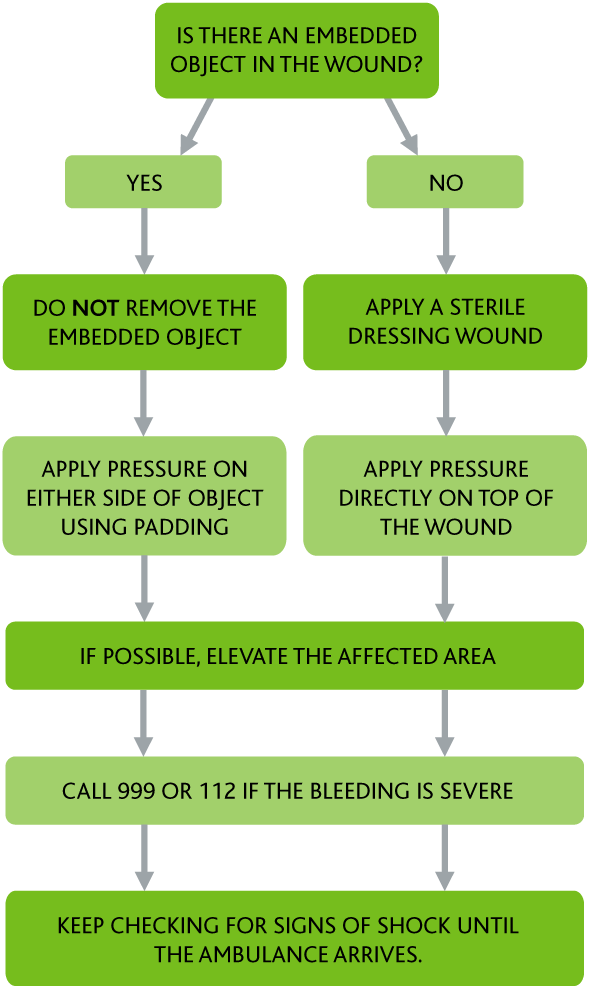
IF THERE IS NO OBJECT EMBEDDED INTO THE WOUND:
1. If possible, use a clean pad or dressing to apply pressure to the wound. Maintain the pressure until the bleeding stops.
2. If bleeding continues through the pad, apply another pad over the top and bandage it in place don’t remove the original pad or dressing, but continue to check that the bleeding has stopped.
3. If possible, elevate the injured area above the heart, whilst still applying pressure.
4. If the bleeding is severe, call 999 or 112 and ask for an ambulance as soon as possible.
5. Keep checking the casualty for signs of shock.
IF THERE IS AN OBJECT EMBEDDED INTO THE WOUND:
- Do NOT remove any embedded objects, (they can often be acting as a plug for the bleeding, and removing the object will make it much worse).
- Instead of applying pressure directly to the wound with a clean pad or dressing, apply pressure to either side of the embedded object instead.
- If possible, elevate the injured area above the heart, whilst still applying pressure.
- If the bleeding is severe, call 999 or 112 and ask for an ambulance as soon as possible.
- Keep checking the casualty for signs of shock.
- If a body part, (such as a finger), has been severed, place it in a plastic bag or wrap it in clingfilm and make sure it goes with the casualty to hospital.
- If someone has a nosebleed that hasn’t stopped after 20 minutes, they should be taken to their nearest accident and emergency department (A&E).
BURNS
REMOVE CLOTHING AND JEWELLERY FROM THE AREA
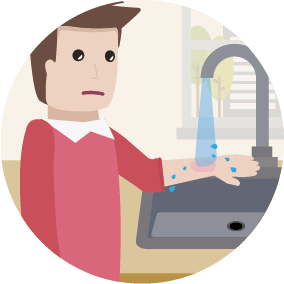
COOL THE BURN WITH COOL OR LUKEWARM WATER
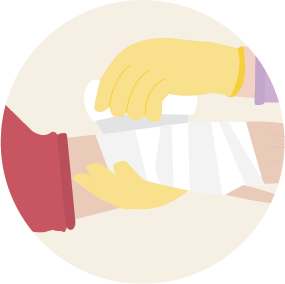
DRESS THE BURN
WHEN TO GO TO A&E
N.B. If you suspect the casualty may have a spinal injury, DO NOT attempt to move them until the Emergency Services reach you.
EYES
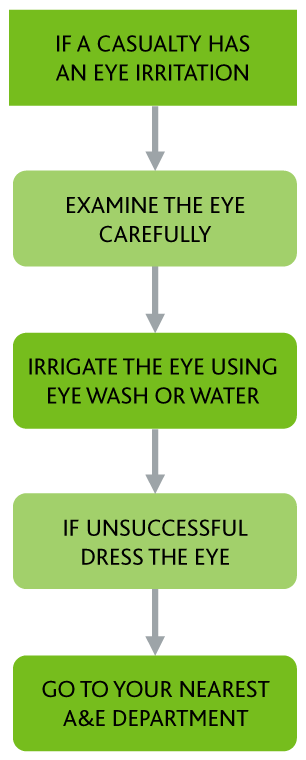
EXAMINE THE EYE:
- Firstly, ask the casualty if they know the source of the contamination.
- Hold the casualty’s eyelid open with your thumb and forefinger, then ask the casualty to look up, down, left, and right so that you can check for any foreign bodies on the eye’s surface.
- If you can see foreign bodies, irrigate the eye.
IRRIGATE THE EYE:
- Sit the casualty down in a comfortable and inclined position, with their head tilted so the affected eye is lower than the unaffected one.
- Use sterile eye wash to irrigate the eye. If this is unavailable, use clean water from a clean container, or cool water straight from the tap.
- If using sterile eye wash, ensure that the bottle is sealed, in-date, and that the contents are clear before using them.
- If using tap water, ensure the temperature is cool, not warm, and only use a container that is completely clean.
- Wash the eye out by pouring water from the inner corner of the eye outward for 10 seconds at a time, allowing the casualty to blink in-between.
- Continue irrigating until the foreign body is removed.
DRESS THE EYE:
- If irrigating the eye does not work, cover the injury with a sterile eye pad dressing and seek medical attention immediately. If it will be a while before you can get medical help, use a bandage to hold the pad in place.
- Advise the patient to keep the uninjured eye closed (if possible) to reduce the risk of movement of the injured eye.
- N.B. If a large fragment of material is protruding from the eye, first immobilise it with rolled dressings on either side of the object rather than putting a dressing over the top, as this would cause further damage.
- Take the casualty to your nearest Accident and Emergency Department (A&E), immediately.
First Aid in the Workplace Quiz
A short quiz to test your knowledge of First Aid in the Workplace.

All information is for guidance only and correct at time of publication.